The Classic Inca Trail is one of the most famous hikes in the world. Pretty much everyone has heard of it and it’s a common bucket list item. The Classic Inca Trail takes you over mountains and through valleys, passing many Inca ruins along the way, before arriving at Machu Picchu four days later. It’s a great hike that combines beautiful scenery with interesting history.
You can read our trip report here and here.
Contents
-
- Summary
- How Hard is the Inca Trail?
- The Easy Bits
- Tips for Preparation
- Other Useful Info
- Easier Alternatives
- Summing it All Up

Summary
How hard is the Inca Trail: 4/5
The Classic Inca Trail (the best-known route to Machu Picchu) takes 4 days and 3 nights. You hike at altitude for 45km (28mi) through the Andes Mountains along the original Inca road. You pass many Inca towns, terraces and temples which you can explore. You camp each night, but porters carry all the heavy camping gear. You can also hire porters to carry extra stuff so all you carry are the things you need during the day. (A big bonus for all you slow hikers like me!) You hike in a group, but they let you go at your own pace most of the time. It’s a well maintained path with stairs, so there’s very little walking on dirt or rough terrain. It’s a well worn route so it’s almost impossible to get lost. All in all; there are a few challenges to overcome, but with some preparation and determination a regular person can do it.How Hard is the Inca Trail?
This section isn’t meant to discourage you from hiking the Inca Trail. This is to help prepare you better so you can enjoy it and not have any unexpected surprises.
Multiday hike
This is a 4 day hike, so if you’ve never done a multi-day hike before then you should do some preparation to make sure you’ll still be able to walk on the last day. Sore feet, knees and legs are common. As well as feeling drained of energy as the hike goes on.
Day by Day
The first day is the easiest because it’s short (5hr & 12km / 7.5mi) and the uphill sections are relatively short. The second day is the hardest because it’s a long day (9hr & 11km / 7mi) and has the highest point on the Inca Trail. You spend ¾ of the second day hiking up stairs. The third day is another long day (9hr & 16km / 10mi) but the uphill sections are a lot shorter. The hardest part is the notorious Gringo Killer (a very long descending staircase). But this day is the most scenic part of the Inca Trail so you don’t notice the long hiking as much.
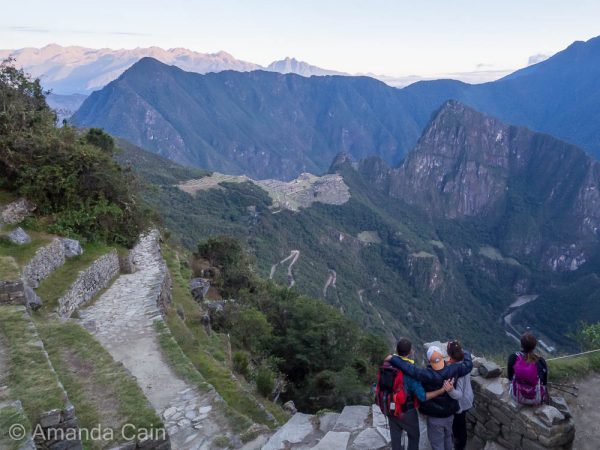
Day 4 is the shortest (2hr & 6km / 3.5mi), but you will be hiking in a long line of hikers all trying to get to the Sun Gate of Machu Picchu in time for dawn. So there will be pressure for you to go fast & stay with your group. But you can drop back and let people overtake you if you need to. There are a lot of people trying to overtake on the last day because they have this stupid idea that the Inca Trail is a race and not a walk to be enjoyed. Ignore these idiots. Don’t forget that you’ll be walking around exploring Machu Picchu when you arrive, so leave a bit in the tank for this.
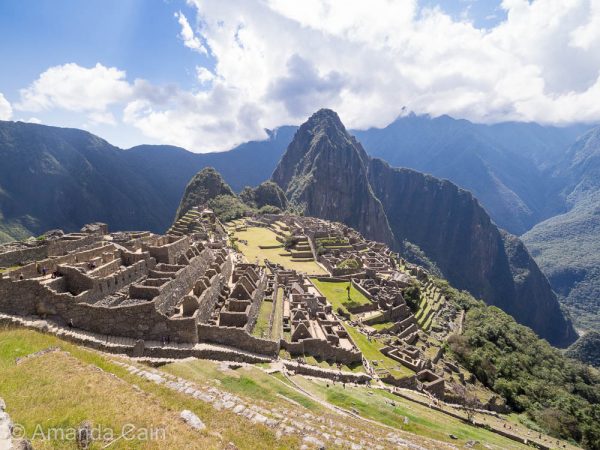
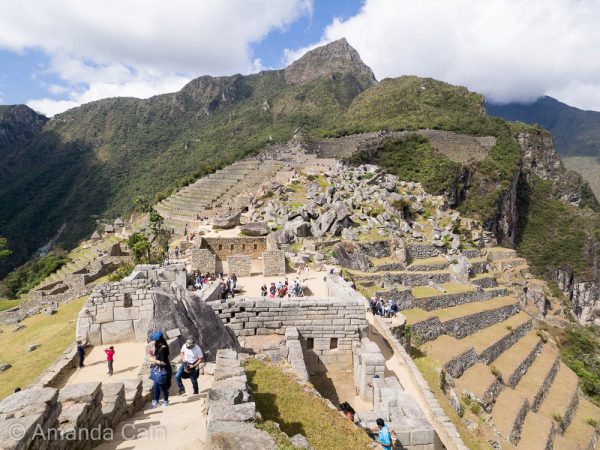
The lost city of Machu Picchu. Altitude
The Inca Trail starts at 2600m (8500ft) above sea level, goes as high as 4215m (13,775ft) at Dead Woman’s Pass (the highest point) before finishing at 2400m (8000ft) at Machu Picchu. Because the whole hike is done at altitude it makes it hard to breathe and this can be a big problem for some people.
Acclimatising
The best way to deal with this is to spend a few days in Cusco (3400m / 11,200ft) beforehand acclimatising to the altitude. Take it easy while you’re acclimatising; not much exertion, avoid alcohol, and drink lots of water and fluids. There’s plenty to see in Cusco so you don’t need to worry about twiddling your thumbs before the Inca Trail.
Another thing you can do is to take some Diamox. This is a prescription medication (you’ll have to go to a doctor) that helps your body adjust quicker to the altitude. And if you are showing the signs of altitude sickness (similar to a really bad hangover), then it can be used to help treat it while you descend to a lower altitude. (Note that I am not a doctor. You should see your doctor for proper medical advice. The advice here should only be used as a guide.)
IMPORTANT
Altitude sickness can be fatal so don’t try and push on if you are showing the symptoms of altitude sickness. Don’t ascend any further. Stop and rest. If your symptoms get worse you need to descend immediately.
Good News
One bit of “good” news is that regular people are just as likely to get altitude sickness as athletes. So if you’re average fitness like we are, then that isn’t necessarily a disadvantage when it comes to altitude sickness.
When you’re hiking up to Dead Woman’s Pass (and any of the long climbs), then the best way to deal with the thin air is to rest regularly. During the climb up to Dead Woman’s Pass it really feels like you can’t fill your lungs no matter how deep you breathe. There’s no need to try and do it all without stopping. (Some people treat the Inca Trail like some kind of macho pissing contest. But there’s no need to participate.)
How to Deal with it.
You’ll increase your chances of making it to the pass (or top of any hill) if you stop regularly to catch your breath. So set yourself a series of small goals: pick a spot not too far ahead, and stop for a rest when you reach it. If it was really hard make the next goal a bit closer. Once you’ve caught your breath start hiking to the next goal. And just keep doing this all the way up. Before you know it you’ll be further up the mountain than you realise. Don’t forget to look back at how far you’ve come. You don’t realise how far it is when you keep looking at the top of the pass ahead. You’ll always feel short of breath hiking up the mountain passes, but when you’re struggling to breathe then it’s well and truly time to stop for a short break.
Don’t worry if you fall behind and lose your group heading up to Dead Woman’s Pass. All the guides let everyone hike at their own pace. One of the guides should bring up the rear and make sure that the last hiker in the group doesn’t get lost. But there’s no pressure for the slow tortoises (like me) to keep up with the fast hikers.
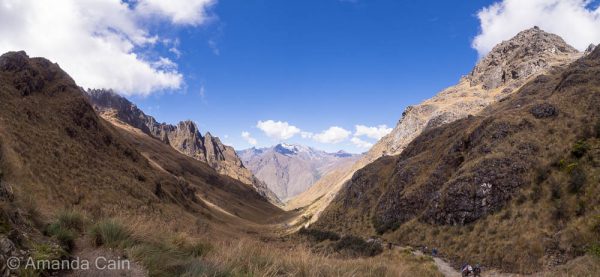
The Inca Trail leading up to Dead Woman’s Pass. Steep
The Incas loved building roads that led straight up mountains and then straight back down the other side. No ramps. No switchback paths. Just stairs. And lots of them. The same advice for altitude applies here: take lots of breaks. Don’t worry about being slow and falling behind. Even the porters stop for regular breaks on the stairs. Something you definitely should have on the Inca Trail are trekking poles. They’re good for pushing yourself up stairs, and also to help you keep your balance and reduce the stress on your knees going down stairs.
Down Can Be Harder than Up
Don’t underestimate going down stairs. This actually puts a lot more stress on your knees than going up. Anyone with knee issues will be familiar with this. If you do have knee problems, bring a brace or some strapping tape to help support your knees. I would recommend putting them on before you start hiking rather than after you start to feel pain. Remember that you want to prevent re-injury, rather than limping along once it’s painful.
The Gringo Killer
The hardest down section comes on the third day after you cross the 3rd mountain pass: the notorious Gringo Killer. This is a very long series of stairs where you lose 800m (2600ft) of altitude with only a few flattish sections. Your knees will definitely feel it when you get to the bottom. If you’re sure-footed you can try going a bit faster down the stairs; at a light jog. This seems to put less strain on the knees than slowly stepping down.
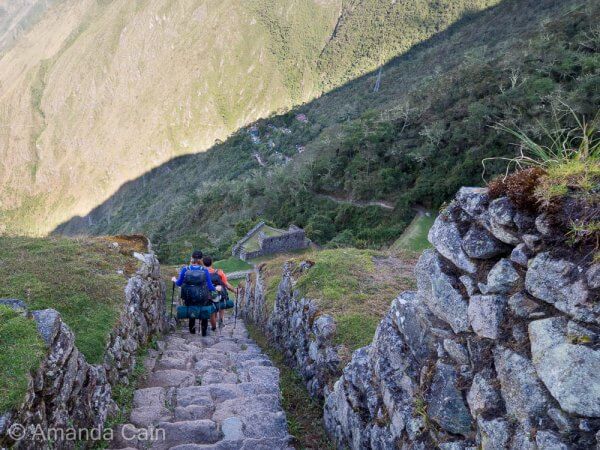
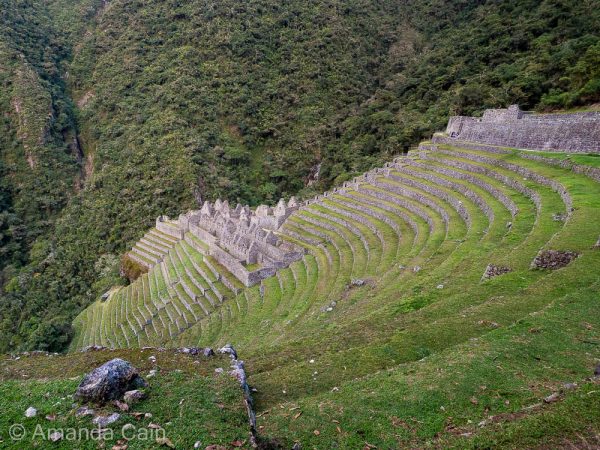
Hiking down through the Inca terraces of Intipata. This comes after the Gringo Killer, but the stairs are the same. Camping
Camping isn’t for everyone, so that’s why I’ve put it here. We think it’s worth putting up with a few days of discomfort for the amazing experience of hiking the Inca Trail. The usual camping discomforts are: hard ground, cold nights, and sub-par toilets. Bad food isn’t a problem here, as the cooks make some amazing things with just a camping stove.
Things you can do to make the experience better are: have a good sleeping mat, have a warm sleeping bag (we used bags with a rating of -10°C and it was still a bit chilly) and bring some good thermals to wear while you sleep. For the toilets; make sure you bring your own toilet paper and hand sanitiser. Sleeping bags and sleeping mats are usually provided by the tour company so ask them which ones they use.
Keeping Warm at Night
Another helpful tip is to get a water bottle (not a thermos or insulated bottle) of hot water and put it in the bottom of your sleeping bag to keep it toasty while you sleep. The porters usually boil water for the hikers to fill their drink bottles. So after dinner get your bottle filled up with boiling water. This made a huge difference for me. The first night I only slept very lightly because of the cold, but on the second night (at much higher altitude & colder) with the hot water bottle I barely woke up.
Steep Drop Offs
This one’s for people with vertigo or a fear of heights. There are some parts of the Inca Trail, particularly on the third & fourth days, where the path has a steep drop off on one side. If this is you, then luckily the other side of the path hugs a cliff so you can stay nice and close to that. There’s no section that has a steep drop off on both sides. The Inca Trail is one-way so no need to worry about oncoming traffic. The rule for hiking is that overtakers use the edge or drop-off side of the path, while the slower people stay on the wall side. So don’t worry about being pushed off by rude overtakers. The path is narrowest on the fourth day, but that just means that there’s only enough room to hike single file. There’s plenty of room for a single hiker.
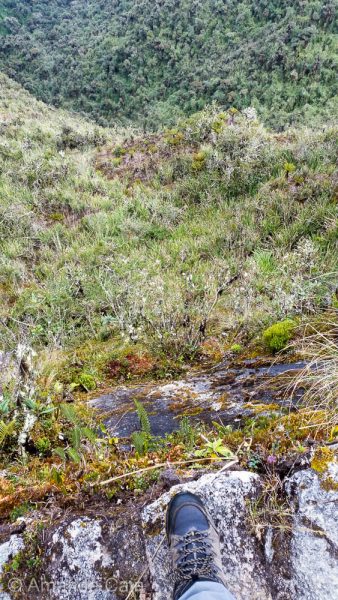
One of the steep drop offs along the Inca Trail. The Easy Bits
Porters
These guys are superhuman. They carry all the heavy camping gear day in, day out. And much faster than any of the hikers who only have to carry a day bag. All the tour companies will allow you to hire a porter to carry up to 6kg of your personal belongings. So you give them your sleeping clothes, spare set of hiking clothes, and anything you don’t need until you get to camp. This way all you need to carry while you hike is: water, snacks, camera and a rain jacket. (Valuable or delicate items should still be carried yourself as the porters are carrying heavy camping gear along with your items, and they tend to drop their packs when they stop for a break)
IMPORTANT
Porters have been mistreated by the companies they work for, and made to carry excessively heavy loads. The authorities are trying to crack down on this and limit the porters to no more than 18kg loads. This is less of a problem on the Classic Inca Trail as it is better policed. But other hiking routes don’t have the same amount of scrutiny. Make sure you pick a company that cares about the well-being of their porters.
Well Maintained Path
Most of the Inca Trail is on the original Inca road built to Machu Picchu. The best way to describe it would be: a rough cobblestoned path. The stones aren’t smooth river stones, but not jagged either. And the gaps between stones are all filled in to give you a lumpy path to walk on. There’s very little hiking on dirt or bare rock. And no clambering over loose stones. So it’s a pretty good hiking option if you’re not so sure-footed. It’s nice not having to watch where you put your feet all the time and you can enjoy more of the scenery.
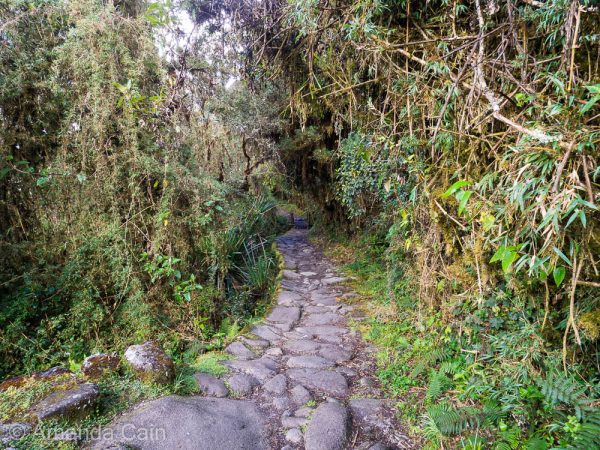
The path of the Inca Trail is similar to this. Large rocks tightly set together. Easy to Follow Path
On the first day and early part of the second day there are a few trails leading off from the Inca Trail. But once you get past this section then it’s pretty much impossible to get lost from taking a wrong turn. The only ‘turn offs’ are paths leading to ruins or campsites right next to the trail. (You can still get lost by completely wandering off the path into the bushes, but you really have to be trying). Guides keep the groups together until early on the second day, so need to worry about getting lost.
Tips for Preparation
Lots of Walking
As the Inca Trail is a multi-day hike, you should try to do some hiking beforehand. Start out with single-day hikes, and then try two single-day hikes on the same weekend to get used to long days of walking back-to-back. You could even try an overnight hike if you’re keen. To increase the intensity (when you’re ready) you can also add some extra weight to a backpack. Water bottles would be best, because then you have extra drinking water. But any heavy object works. If you’re not near any hiking paths, then you could always go for long walks in the area where you live. The main thing is to get used to long days of walking. I wouldn’t recommend the gym for this because spending 4-8 hours on the treadmill at walking speed is pretty boring.
Stairs
There’s a lot of stair climbing and descending on the Inca Trail so you’ll want to get your legs into shape for that. Take the stairs everywhere you go! No elevators or escalators. It would be worth finding a tall staircase where you can do a stair workout a couple of times a week. Make sure to work on going up AND down the stairs. And the same as above, you can add weight to a backpack to help increase the intensity of the exercise.
Altitude
The only way you can really prepare for the altitude is to get to Cusco 2-3 days early. But I would recommend more if you can because there’s so much to see. Then spend time walking around town to get used to the altitude. Take it easy at the start while your body is adjusting. When a short walk isn’t a struggle I would recommend walking up to the ruins of Saqsaywaman on the hill above Cusco. Taking Diamox when you arrive in Cusco can also help your body adapt to the altitude faster. Coca tea and coca leaves are everywhere, and plenty of people will recommend them for altitude sickness. But the only thing that has been scientifically proven to work is Diamox.

Walking up to the ruins of Saqsaywaman will give you a taste of what the Inca Trail will be like. Other Useful Info
Numbers
These will vary slightly depending on which campsites you use. The times here are the time spent hiking each day by me (a tortoise hiker). You will get a long rest at lunchtime which gives you a nice break.
Day 1 – 12 km (7.5 mi) & 5 hours, 2600 – 3100m (8500-10,000 ft) altitude range
Day 2 – 11 km (7 mi) & 9 hours, 3100 – 4215m (10,000 – 13,776 ft) altitude range
Day 3 – 16 km (10 mi) & 9 hours, 2700 – 3950m (9000 – 13,000 ft) altitude range
Day 4 – 6 km (3.5 mi) & 2 hours, 2400 – 2700m (8000 – 9000 ft) altitude rangeWebsites
Peru Treks – One of the best regarded operators and the one we used for our trek. They also have an extensive FAQ and update their website regularly with the latest news (the authorities frequently change the rules).
Inca Trail Peru – An independant site with lots of helpful information on the Inca Trail, alternatives and how to choose a good operator.
Official Machu Picchu website – The site is a bit spotty but you can use it to see what permits are still available.Easier Alternatives
2 Day Inca Trail
There’s a 2 day version of the Inca Trail which starts much closer to Machu Picchu and meets the Classic Inca Trail at the ruins of Wiñay Wayna. This is a great alternative if you’re not up to doing the full Inca Trail because it’s the only other way to see Wiñay Wayna. (Which we think was better than Machu Picchu). After Wiñay Wayna you follow the same route as the Classic Inca Trail and reach Machu Picchu in the afternoon. You go back to Machu Picchu the next day for a tour and longer visit. So you do all your hiking on the first day. If you really hate camping this is a good option as you spend the night in the town of Aguas Calientes.
The ruins of Wiñay Wayna. Only accessible by hiking the Classic Inca Trail or the 2 Day Inca Trail. Hike from Aguas Calientes
If you want to hike to Machu Picchu but can’t do the full Inca Trail you can also hike up the mountain from the town of Aguas Calientes. Since the wait for the bus takes an hour and half or longer, it could honestly be faster to hike. The buses follow a switchback road up to Machu Picchu, while the path just goes straight up. (More stairs, yay!) You’ll have to cross the road a dozen times, but only buses drive this route and they’re used to seeing people scurry across the road.
Wayna Picchu Hike
For only US$15 more to your Machu Picchu ticket you can climb to the top of Wayna Picchu. (The big tall mountain in all the photos you see of Machu Picchu). You access this from inside Machu Picchu itself. So you can take the bus or hike from Aguas Calientes. While we haven’t personally climbed it (tickets sell out months in advance), reports are that the path is steep and narrow, and has steep drop offs on the side.
Machu Picchu Mountain Hike
For only US$15 more to your Machu Picchu ticket you can climb to the top of Machu Picchu Mountain. You access this from inside Machu Picchu itself. So you can take the bus or hike from Aguas Calientes. This one is not as popular Wayna Picchu and you can probably book it at the last minute. But it’s twice as high as Wayna Picchu and has similar difficulties to the Inca Trail (altitude, steep, and steep drop offs). But you get a great view from way above Machu Picchu.
The reverse view of Machu Picchu. In the background you can see Machu Picchu Mountain sticking up waaaaay up into the sky. 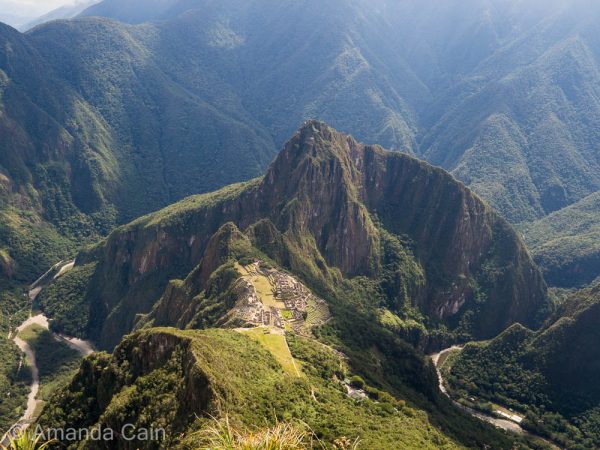
The view of Machu Picchu from way up on top of Machu Picchu Mountain. Wayna Picchu is the tall mountain with long ridges sticking out from either side. Summing it All Up
How hard is the Inca Trail? Fairly hard. The altitude and the stairs are a real challenge. Porters make it easier by carrying the heavy stuff. Incredible views and exploring Inca ruins help make up for the difficulties. If we hadn’t hiked the W in Torres del Paine, we would give the Inca Trail 5/5 for difficulty.
Thanks Amanda
That’s a great summary of what to expect and how to prepare. Time to strap on my boots and get training.
Cheers Romi! Hope the info helps you have a great and enjoyable hike rather than being unprepared and miserable. Knowing what to expect I think goes a long way to being mentally able to tackle it.
This is a wonderful summary of the hike. Many thanks.
My partner (76) is heading off to do this trail and even though he’s super fit, he’s a bit nervous. Your article has been very useful for him.
He’s done the Torres deal Paine in a blizzard so is hoping he won’t have issues. Again many thanks